 Current
location:
Current
location:As one of the core tools in laboratory and industrial testing, the liquid density meter has become a key assistant in analyzing liquid properties with its high-precision measurement capabilities. Whether it is scientific research experiments, quality control or production monitoring, it is crucial to master its operation steps.
Correct use of the liquid density meter can not only ensure the accuracy of the measurement results, but also improve work efficiency and avoid errors caused by operating errors. This article will take you to an in-depth analysis of the operation process of the liquid density meter, from power-on to reading, from liquid aspiration to liquid discharge, to help you easily master this precision instrument and unlock the secret of efficient measurement.
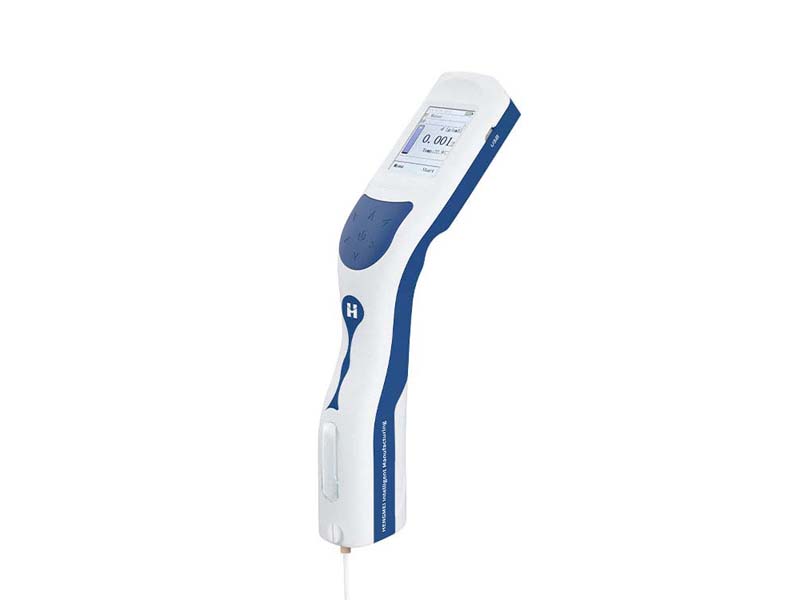
Ⅰ. Structure and function of liquid density meter
Display: Full-color LCD display for displaying user interface
NFC card swiping area: This area is the card swiping antenna position, used for NFC card interaction
Button: Function operation button
Measurement pool observation window: Observe whether there is liquid and bubbles in the measurement pool
Syringe filling hole: Interface for filling and emptying the measurement pool with a syringe
Pipette: Suction and discharge tube of the measurement pool
Sampling pump observation window: Check the sampling pump and check whether the sample is empty or full
Sampling pump cover: Sampling pump maintenance window
USB-C port: Interface for charging, connecting to a computer, and connecting to a USB flash drive
Barcode scanner: For barcode and QR code scanning
Ⅱ. Operation steps of liquid density meter
1. Connect the pipette to the instrument.
2. Press the power button to turn on the machine.
3. Insert the pipette into the sample to be tested and press the up key on the direction key to start sucking the sample.
4. After the sample is sucked, press the upper right arrow to start the measurement program. The measurement is over and the test results are confirmed.
5. Press the menu key to query the test record in the history record.
6. Press the down arrow key to discharge the sample.
III. Daily maintenance of liquid density meter
1. Pipe cleaning
After using the liquid density meter, it needs to be cleaned immediately. You can choose different types of cleaning agents for the measured samples. At the end of the cleaning, you need to use clean water to clean the machine to prevent residues from depositing on the internal pipeline.
Note: When the sample to be tested does not have a corresponding cleaning solvent, you should avoid using the instrument for testing to prevent pipeline blockage.
2. Cleaning the instrument shell
The liquid density meter shell is made of ABS material. It is recommended to use a soft towel and clean water to clean the shell. When using other cleaning agents, please read the cleaning agent instructions in detail.
3. Instrument inspection
For instruments that have not been used for a long time, or for application scenarios with high measurement requirements, the instrument needs to be inspected before use. Enter the "Equipment Inspection" item in the system menu, right-click to start, and use pure water to inspect the machine. When using other substances as standards, users are required to set the parameters of the standard substances themselves.
4. Instrument calibration
Since the detection principle of liquid density meter includes mechanical oscillation, the measured value will have a certain deviation during long-term storage or use due to the influence of material deformation. At this time, the user is allowed to calibrate the instrument by himself.
Instrument calibration is divided into two-point calibration: standard material (pure water is recommended) and empty tube (dry air). When calibrating with dry air, an air pump is required to dry the internal glass tube. During use, the user can only calibrate with standard materials.
Liquid density meter has greatly improved the efficiency and accuracy of liquid density detection with its intelligent design and stable performance. From daily operation to regular maintenance, scientific step management can extend the life of the equipment and ensure the authenticity of the data. Whether it is quality inspection, R&D or production control, mastering the correct use of liquid density meter can provide strong support for your experiments and process optimization.
Article address:http://www.labinstruments.net/news/50.html